Jan 28

Cash Plan & Cash Flow Report

Ingin melakukan perencanaan keuangan? Sekarang Goodwill ERP sudah menyediakan fitur Cash Plan.

Fungsi dari fitur baru ini adalah membuat jadwal perencanaan pengeluaran dan pemasukan kas, mulai dari peruntukannya sampai periode yang telah ditentukan. Seperti contoh berikut ini adalah Cash Plan untuk investasi dalam sebuah project pembangunan.

Untitled-1

Ada 3 macam arus kas yakni :

  1. Operational, misalnya planning untuk pembayaran leasing kendaraan atau sewa kantor,
  2. Investment, misalnya planning untuk pembelian kendaraan
  3. Financing, misalnya planning untuk pengucuran kredit dari bank.

Disini saya memilih investment karena tujuan project sebagai investasi.

Setelah itu kita bisa memasukkan detail arus kas seperti tanggal dan besaran nilainya di tab Cash Plan Line. Jika arus kas ini terjadi berulang-ulang selama masa tertentu, misalnya 5 minggu, maka kita bisa menggunakan bantuan tombol Generate Periodic Plan.

Untitled

Disini kita dapat memilih peruntukannya untuk project, activity, product, charge atau business partner tertentu, kemudian tentukan rutinitas pengeluarannya apakah harian, mingguan, bulanan dst. Setelah itu berapa lama akan berlangsung isi pada kolom repetitions, kemudian tentukan nilai yang akan dikeluarkan per periodic pada kolom amount , dan tentukan tanggal dimulai , serta persentase peluang yang akan terjadi pada kolom probability. Terakhir tekan ok maka akan terbentuk baris sebanyak repetitions yang kita masukkan.

Untitled-2

Selanjutnya untuk melihat laporan proyeksi arus kas secara keseluruhan, kita bisa menggunakan menu Cash Flow Report. Report ini akan menyajikan informasi arus kas yang utamanya berasal dari gabungan AR dan AP kita.

Cash Flow Parameter

Isi sampai tanggal berapa informasi yang ingin ditampilkan. Accounting schema tidak perlu diganti, dan isilah account element dengan akun Kas & Bank karena kita ingin melihat data yang berhubungan dengan arus kas. Kita juga bisa memilih option Include Cash Plan jika kita ingin menampilkan informasi arus kas yang sudah disiapkan lewat Cash Plan di atas. Sedangkan option Include Orders untuk mengikut-sertakan data komitmen pengeluaran/pemasukan yang berasal dari Purchase/Sales Order yang sudah dibuat sebelumnya.

report

Apabila ada pertanyaan lebih lanjut silahkan tanyakan kepada staff kami, Semoga Bermanfaat!.

Sep 25

Cara Mencetak Custom Paper dengan Adobe Reader di Firefox

Permasalahan yang sering kami temukan saat implementasi adalah user ingin menggunakan custom paper akan tetapi hasil print tidak sesuai dengan apa yang diharapkan, oleh karena itu kami menulis blog mengenai bagaimana cara agar dapat menghasilkan print sesuai harapan.

Tujuan instalasi ini adalah agar custom paper yang telah di setting dapat di print sesuai dengan ukuran kertasnya.

Langkah Pertama

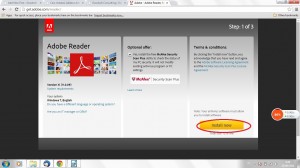
Pastikan instalasi dilakukan pada komputer yang terhubung dengan printer, download Adobe Reader di http://get.adobe.com/reader/

 step-1


Lalu klik tombol Install now seperti pada gambar diatas yang sudah dilingkari.

Kemudian dilanjutkan dengan proses instalasi.

step-2

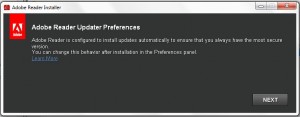
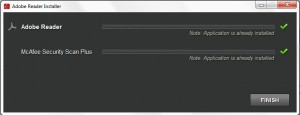
Klik Next, tunggu proses download dan instalasi.

step-4

Selesai langkah pertama.

Langkah kedua

Setelah melewati langkah pertama dilanjutkan dengan tahap konfigurasi ,

tahap konfigurasi ini dibagi menjadi 3 konfigurasi yaitu ;

  1. Web Browser (Firefox).

Konfigurasi ini dilakukan agar web Browser dapat mengenali addons yang akan digunakan untuk membuka file PDF.

Klik  logo  kemudian  pilih Options, cari Tab Application Panel

lalu Portable Document Format (PDF) kemudian pilih Adobe Acrobat(in firefox). Untuk lebih jelas ada pada gambar di bawah ini.

step-5

   2. Printer (Custom Paper).


Masuk ke Control Panel cari Devices and Printers, pilih printer yang akan di gunakan, pada bagian atas ada tepatnya dibawah path folder pilih Printer server properties, akan muncul seperti gambar di bawah ini.

step

Centang Create a new form dan masukan ukuran kertas yang diinginkan lalu tekan tombol Save form.Pastikan untuk mengukur kertas yang hendak digunakan.

    3.Adobe Reader.

Konfigurasi pada Adobe Reader pastikan pada saat print, printer yang digunakan sudah benar, dan klik tombol Page Setup untuk memilih ukuran kertas yang diinginkan.

step-3 Pada gambar diatas terdapat lingkaran merah pastikan tidak tercentang.

Semoga Membantu.

Mar 10

Cara Instalasi Adempiere di Cloud

Rasanya sudah lama kami tidak mengulas topik mengenai instalasi. Makanya untuk meneruskan tradisi ini, dalam postingan kali ini saya akan menerangkan bagaimana cara instalasi Adempiere di cloud.

KONFIGURASI

Pada prinsipnya instalasi di cloud sama dengan yang biasa kita lakukan di server sendiri (on-premise). Saya mengasumsikan anda sudah menyiapkan dua buah virtual machine dengan sistem operasi CentOS 64 bit. Satu untuk application server dan satu lagi untuk database servernya. Dalam contoh di bawah, asumsikan IP masing-masing adalah 10.210.10.101 dan 10.210.10.102. Kalau anda mau coba-coba di local machine, anda bisa juga menggunakan VirtualBox. Untuk spek virtual hardwarenya, saya menganjurkan 2 CPU core dan 4 GB RAM.

Kalau anda sudah mempunyai VM, anda bisa memeriksa dulu konfigurasi VM anda tersebut.

Cara memeriksa versi CentOs:

# cat /etc/redhat-release

Cara memeriksa OS 32 bit atau 64 bit :

# uname -a

Kalau hasilnya seperti ini artinya 64 bit.
Linux hostname 2.6.9-55.0.2.ELsmp #1 SMP Tue Jun 12 17:58:20 EDT 2007 x86_64 x86_64 x86_64 GNU/Linux

Kalau hasilnya seperti ini artinya 32 bit.
Linux hostname 2.6.9-55.0.2.ELsmp #1 SMP Tue Jun 12 17:59:08 EDT 2007 i686 i686 i386 GNU/Linux

Memeriksa CPU info :

# cat /proc/cpuinfo

# lspci -vv

INSTALL DATABASE

Ok, sekarang sudah siap ? Let’s get started. Kita sekarang login pakai root ke database servernya dulu.

Download PostgreSQL

# wget http://yum.postgresql.org/9.2/redhat/rhel-6-x86_64/pgdg-centos92-9.2-6.noarch.rpm
# rpm -i http://yum.postgresql.org/9.2/redhat/rhel-6-x86_64/pgdg-centos92-9.2-6.noarch.rpm
# yum install postgresql92-server postgresql92-contrib

# service postgresql-9.2 initdb

# service postgresql-9.2 start

Set PostgreSQL 9 Environment:

# su – postgres
# nano .bash_profile

[ -f /etc/profile ] && source /etc/profile
PGDATA=/var/lib/pgsql/9.2/data
export PGDATA
PATH=$PATH:$HOME/bin:/usr/pgsql-9.2/bin
export PATH

Jangan logout dulu, sekarang kita harus ganti password postgres:

# psql

postgres=# ALTER USER postgres WITH PASSWORD ‘mySecurePassword’;
postgres=# \q
# exit

# passwd postgres
– mySecurePassword

Kemudian jangan lupa konfigurasi file pg_hba.conf dan postgresql.conf:

# nano /var/lib/pgsql/9.2/data/pg_hba.conf

# nano /var/lib/pgsql/9.2/data/postgresql.conf

Sekarang kita nyalakan service-nya.

# service postgresql-9.2 restart

Supaya service-nya otomatis dinyalakan pada waktu booting:

# chkconfig –level 234 postgresql-9.2 on
# chkconfig –list postgresql

Setelah itu, buatlah user ‘adempiere’ di PostgreSQL (don’t change the user name!)

# su – postgres
# psql

postgres=# CREATE USER adempiere WITH PASSWORD ‘adempiere’;
postgres=# CREATE DATABASE starprise;
postgres=# \q

Sampai disini, database server sudah siap.

INSTALL JDK

Kita sekarang login pakai root ke application server. Pertama-tama kita install dulu Oracle JDK. Bisa juga pakai OpenJDK sebagai alternatif. Untuk mengunduhnya, Oracle mensyaratkan kita untuk menyetujui halaman perjanjian lisensi terlebih dahulu. Tapi karena kita sekarang sedang berada dalam VM yang tidak mempunyai GUI, maka kita perlu sedikit trik supaya server Oracle mengira kita sudah menyetujui halaman tersebut. Cobalah perintah di bawah ini.

# wget –no-cookies –header “Cookie: gpw_e24=http%3A%2F%2Fwww.oracle.com” http://download.oracle.com/otn-pub/java/jdk/6u38-b05/jdk-6u38-linux-x64-rpm.bin

Ok, kalau sukses, anda segera lanjutkan dengan menginstall JDK-nya.

# sh jdk-6u14-linux-i586-rpm.bin
accept license

# ln -s -f /usr/java/jdk1.6.0_38/bin/java /usr/bin/java

# java -version

Set java home and path:

# cd /etc/profile.d
# nano /etc/profile.d/starprise.sh

Isi dari file starprise.sh ini adalah sebagai berikut:

export JAVA_HOME=/usr/java/jdk1.6.0_38/
export ADEMPIERE_HOME=/opt/Adempiere
export PATH=$PATH:$HOME/bin:$JAVA_HOME/bin

Sampai disini anda jangan logout dulu dari Application Server.

INSTALL ADEMPIERE

Sebelum anda melanjutkan ke langkah berikutnya, coba dulu apakah Application Server anda bisa connect ke Database Server.

# psql -h 10.210.10.102 -p 5432 -U adempiere -d starprise

Kalau tidak bisa, anda harus periksa ulang konfigurasi pg_hba dan iptables di Database Server.
Jika berhasil, maka anda lanjutkan dengan menginstall Adempiere.

# useradd adempiere
# passwd adempiere

Pastikan resolusi nama server dengan IP Public:

# hostname
# nano /etc/hosts

tambahkan seperti ini kira-kiranya: 118.99.99.99 GoodWill

# unzip Adempiere_370.zip -d /opt/

Copy juga file AdempiereEnv.properties yang sudah dikonfigurasi sebelumnya.

scp AdempiereEnv.properties root@118.99.99.99:/opt/Adempiere

Ubah port ke 8080 & 4433 di dalam file ini (karena non root tidak boleh pakai port < 1000)

Supaya Adempiere service otomatis dijalankan ketika booting:

# chmod +x /etc/init.d/adempiere

# chkconfig adempiere on

Salah satu masalah yang sering dialami oleh para nubie adalah masalah kepemilikan log file. Seringnya gara-gara owner-nya adalah root, oleh sebab itu anda harus ganti menjadi user dan group anda.

# cd /opt
# chown -R adempiere Adempiere
# chgrp -R adempiere Adempiere

# cd Adempiere/
# chmod +x *.sh
# chmod +x utils/*.sh
# chmod +x utils/postgresql/*.sh

Sekarang anda boleh login dengan menggunakan user adempiere.

# sh RUN_silentsetup.sh

Konfigurasi Adempiere.properties
– ubah MaxPoolSize kurang dari PostgreSQL max_connections

Import Database

# sh utils/RUN_DBRestore.sh

Nyalakan servernya:

# service adempiere start

Selamat! Anda telah berhasil melakukan instalasi Adempiere ke cloud. Sekarang anda boleh coba buka IP Public anda di dalam browser, sambil jangan lupa menambahkan port 8080. Jika tidak ada masalah, maka anda akan segera masuk ke halaman muka Adempiere. Jika masih belum berhasil, anda harus periksa kembali konfigurasi port di dalam Iptables Application Server.

Goodwill Consulting is a long time Adempiere / Idempiere supporter since their inception. We are offering software-as-a-service solution on the cloud based on Adempiere / Idempiere. For more information, you can drop us a visit at www.goodwillerp.com

Nov 22

Flexible Precision In Numeric Display Type

Hi all,

Today I would like to share my approach to provide  flexible precision in numeric display type. As you know there are several numeric display types in Adempiere / Idempiere. You can find them in the list of Reference Type in Table & Column window. You can see you can have either Number, Amount, Cost+Price, Quantity or Integer. While Integer is obviously for whole number, there is confusion to know the difference between the rest.

The differences are easily tracked down in DisplayType class which you can find in org.compiere.util. It is the minimum number of digits allowed in the fraction portion of a number. So there you have:

Integer  : None
Quantity : None
Amount   : 2
Cost+Price: 2
Number   : 1

As you can see Cost+Price is having the same number of digits as Amount. You can not tell the difference between the two. So let’s make some difference. My workaround is to modify one line in DisplayType class. I would change the code so the minimum fraction digits for Cost+Price is taken from System Configuration that I can manage later. It even gives me better flexibility!

else if (displayType == CostPrice)
{
format.setMaximumIntegerDigits(MAX_DIGITS);
format.setMaximumFractionDigits(MAX_FRACTION);
format.setMinimumFractionDigits(
MSysConfig.getIntValue(“DISPLAY_TYPE_COSTPRICE_FRACTION”, AMOUNT_FRACTION, Env.getAD_Client_ID(Env.getCtx())));
}

In implementation you would probably need to have a numeric display type where it can support more than 2 number of digits in the fraction portion. I hope the modification I share with you today can help you in this situation.

Goodwill Consulting is a long time Adempiere / Idempiere supporter since their inception. We are offering software-as-a-service solution on the cloud based on Adempiere / Idempiere. For more information, you can drop us a visit at www.goodwillerp.com

Nov 11

Payment Term with Fixed Payment Schedule date

How often you wish you could do something to tweak your ERP ? The blessing to use an open source ERP is you have access to its source codes. Isn’t it great if you could just make a lil bit change so you can get exactly what you want, and not to depend on what your software dictates you.

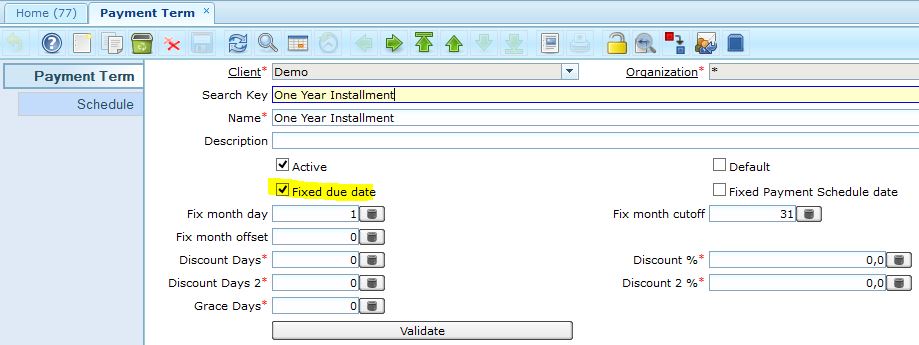
During one implementation in a car dealer, we were facing with one requirement to support installment sales. We thought it should be easy as we knew Adempiere has already payment schedule feature. Just open up Payment Term window and create a new payment term with Fixed Due Date being checked.

1-year-installment

1-year-installment

And then we entered all the schedules with equally divided percentages, for example if it is a one-year installment than the percentage is 100/12, which 8.3333. The net days is how Adempiere will determine the due date of each schedule, which in this case is the accumulation of 30 days that end up to 360 days (supposedly equal to one year length).

Payment Schedule

Payment Schedule

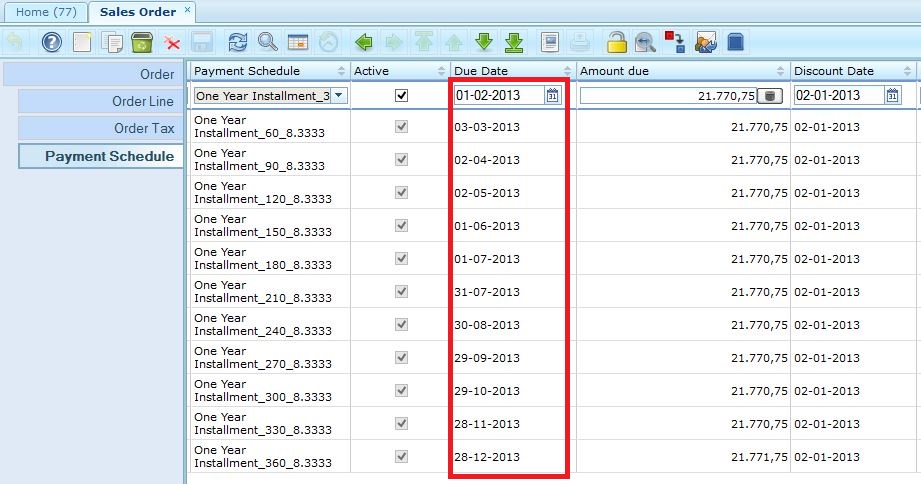
However, the Fixed Due Date option didn’t give what we expected. The Due date is falling on different date each month! And the worst is in one occasion, two schedules can due on the same month (see month of July in the picture below).

Order Schedule before tweak

Order Schedule before tweak

How it happens ? Because every month has a different length in days, you can’t just accumulate the net days with an exact 30-day length. That explains how we end up with 360 days a year, and not 365 days as in actual.

Luckily we are using open source ERP. There is nothing can stop us. The show must go on. So what we did it back in the day is to bring a new option called Fixed Payment Schedule date. This option will complement the existing Fixed Due date feature.

1-year-installment_fixed

1-year-installment_fixed

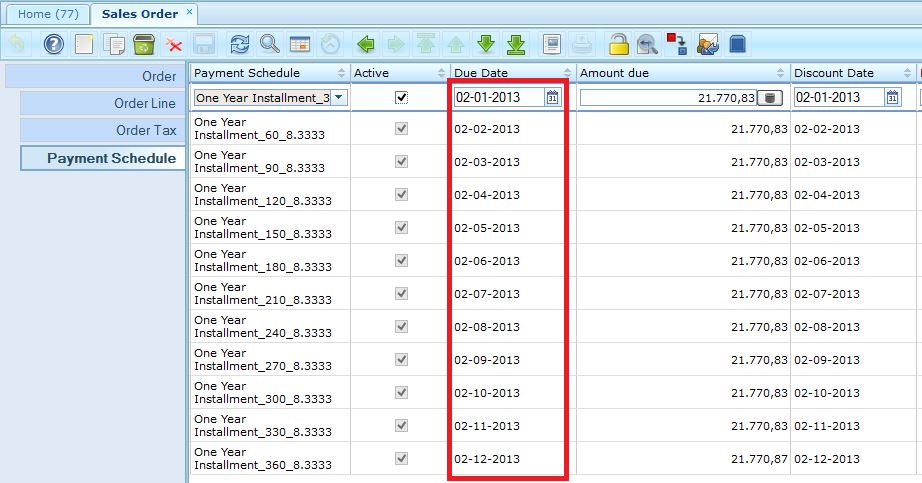
The following is how the schedule is generated using this new option. It exactly gives what our client wants that for each month of the installment period, the Due date will certainly fall into the same date. And that shows the power of open source ERP!

Order Schedule after fixed

Order Schedule after fixed

If you think this feature is worthy enough to be included in the next release of Adempiere or Idempiere, let us know. We will also be grateful to have your feedback. Until next time!

Goodwill Consulting is a long time Adempiere / Idempiere supporter since their inception. We are offering software-as-a-service solution on the cloud based on Adempiere / Idempiere. For more information, you can drop us a visit at www.goodwillerp.com

Oct 29

Adempiere Cheat Sheet (2)

Ok, sesuai janji penulis akan meneruskan artikel mengenai Adempiere Cheat Sheet.

Apa bedanya SubType SO (Sales Order) ?

Sales Order terdiri atas beberapa sub tipe. Setiap sub tipe mempunyai kelakuan khusus. Untuk tipe POS misalnya, jika dicomplete maka ia akan langsung membuat Shipment, Invoice dan Cash Journal. Sementara pada tipe Standard Order, seluruh dokumen tersebut harus dibuat satu per satu mengikuti aturan yang ada.

Ini dia daftar selengkapnya:

POS = SO -> MM -> AR -> Cash Journal
On Credit Order = SO -> MM -> AR
Prepay Order = SO -> waiting for Payment -> MM -> AR
Warehouse Order = SO -> MM

DOCUMENT SEQUENCE PREFIX PATTERN

Tahukah Anda Adempiere memiliki fitur canggih dalam penomoran dokumen ? Anda bisa menyisipkan nilai dari sebuah kolom ke dalam prefix atau suffix dari nomor dokumen yang digenerate oleh sistem. Misalnya, jika Anda menerapkan penomoran dokumen per cabang, maka Anda ingin menyisipkan kode cabang pada prefix dokumen supaya nomor dokumennya unik dan mudah diidentifikasikan.

Caranya mudah. Pada window Document Sequence, sebagai contoh masukan “SO/@AD_Org_ID@” pada field Prefix.

Maka variabel @AD_Org_ID@ akan diartikan sebagai perintah untuk mencetak kode id organisasi yang bersangkutan secara otomatis. Jika kode id dirasa tidak manusiawi, maka Anda pun bisa melakukan seperti ini:

Ubahlah isian di atas menjadi “SO/@AD_Org_ID<Value>@”.

Adempiere akan menerjemahkan ini sebagai perintah untuk lookup ke table AD_Org dan mengambil isi dari field Value yang ada pada table tersebut untuk disisipkan ke dalam prefix nomor dokumen. Dengan demikian, maka nomor dokumen Anda kira-kira akan seperti ini hasilnya:

SO/JKT/1…

SO/MDN/1…

SO/SBY/1…

Libero BOM

Set the BOM Type to ‘Make-to-Kit’, as this option will be useful when we create manufacturing order directly from the sales order. BOM Type has following options

Make-to-Kit -> Create a Manufacturing Order, Receipt for the finish product and issue the Components automatically
Current Active -> Only one active BOM will be allowed for a product
Make-to-Order – > Components can have attribute set instance, otherwise it will not allow
Product Configure -> No Implementation
Repair -> No Implementation

Set BOM Use to ‘Manufacturing’. Following BOM Use options are available

Master -> No Implementation
Engineering -> No Implementation
Manufacturing -> Create a Manufacturing Order, Receipt the finish product and issue the Components automaticaly
Planning -> No Implementation
Quantity -> No Implementation

Change Notice is useful, when some one wants to change the composition of existing BOM product. Generally in manufacturing, changing composition is governed by set rules.

Step (4) Configure Product Components in ‘Components’ included tab on the BoM tab of product window

Set Component Type to Component
Set Issue Method to Back Flush. Following Issue Method Types are supported:
Back Flush – Raw Material will be reduced automatically and components will be increased automatically
Issue – No implementation
Floor Stock – No Implementation
Components Can be configured as percentage, but in the current example we have used quantity

————————————————————————————-
The Libero BOM Component Type can be:

1.- By Product: Define a By Product as Component into BOM
2.- Component: Define a normal Component into BOM
3.- Option: Define an Option for Product Configure BOM  -> Optional
4.- Phantom: Define a Phantom as Component into BOM
5.- Packing: Define a Packing as Component into BOM
6.- Planning : Define Planning as Component into BOM
7.- Tools: Define Tools as Component into BOM
8.- Variant: Define Variant  for Product Configure BOM -> Alternative 1..9, then Optional

Daftar Table ID dan Urutan Proses Posting (Adempiere v.342)

public static int[]  documentsTableID = new int[] {
MJournal.Table_ID,            //  GL_Journal – 224
MOrder.Table_ID,            //  C_Order – 259
MInvoice.Table_ID,            //  C_Invoice – 318
MInOut.Table_ID,            //  M_InOut – 319
MInventory.Table_ID,        //  M_Inventory – 321
MMovement.Table_ID,            //  M_Movement – 323
X_M_Production.Table_ID,    //  M_Production – 325
MPayment.Table_ID,             //  C_Payment – 335
MBankStatement.Table_ID,    //  C_BankStatement – 392
MCash.Table_ID,                //  C_Cash – 407
MMatchInv.Table_ID,            //  M_MatchInv – 472
MMatchPO.Table_ID,            //  M_MatchPO – 473
MProjectIssue.Table_ID,        //    C_ProjectIssue – 623
MRequisition.Table_ID,        //    M_Requisition – 702
MAllocationHdr.Table_ID    //  C_Allocation – 735
};

Price List Schema

Ketika menyusun Price List Schema, mulailah dari kondisi yang general menuju spesifik. Baris pertama biasanya diisi dengan kondisi yang general (biarkan semua kolom kosong). Ini memastikan semua item akan masuk ke dalam Price List nantinya. Kemudian lanjutkan pada baris kedua dengan kondisi yang agak spesifik (misalnya Product Category diisi). Lalu lanjutkan lagi pada baris ketiga dengan kondisi yang makin spesifik (misalnya kolom Product diisi).

Cara pengisian yang terbalik (spesifik -> general) akan membuat hasil proses Generate Price List menjadi tidak benar karena rumusan kondisi yang spesifik akan tertimpa dengan rumusan yang general.

Staging Discount

Anda bisa menerapkan staging discount di dalam Discount Schema. Yang Anda harus perhatikan adalah urutan pengisiannya harus dimulai dari nilai break yang terbesar. Misalnya Anda sedang menyiapkan promo diskon untuk pembelian 10 unit diskon 1%, 50 unit diskon 2% dan 100 unit diskon 4%. Maka urutan pengisiannya harus dimulai dari yang terbesar yakni 100 unit pada baris 10, disusul dengan 50 unit pada baris 20 dan terakhir 10 unit pada baris 30.

discountbreak

Catatan: Nomor baris sengaja dilongkapi 10 supaya jika Anda butuh penambahan, maka Anda bisa menyisipkannya dengan mudah tanpa harus melakukan pengurutan seluruhnya.

Demikian Adempiere Cheat Sheet kali ini. Mudah-mudahan bermanfaat. Sampai jumpa.

Goodwill Consulting adalah bagian dari komunitas pengembang dan pendukung Adempiere. Jika Anda membutuhkan bantuan profesional untuk implementasi Adempiere, silahkan menghubungi kami.

Oct 29

Implementation options for holding company

Implementation options for holding company.

Many times we are facing this scenario. Our client has more than one business (legal) entities. How do you deal with that ?

Option 1: Implement in single Adempiere client (A as the holding company). The subsidiaries will go as Organization A1, Organization A2, and so on.

Consequences:
– All subsidaries must be 100% own, as Adempiere don’t take care of % role up.
e.g. Company A own 51% of company A1, hence only will take in 51% of profit, assets, liability…etc…
– All data is in one Client instance. So,
+ Online realtime information access & reports
+ One mass up, all mass up (possible)
+ One Financial Calendar (not all company share the same Financial Calendar.
Some are Industry driven.)   – You can make each Organization have their own calendar but at the end you lose the ability to consolidate)
+ So everyone open and close period the same time.
+ One accounting schema (Segment value is also very much Industry specific)
+ One accounting elements (COA) – Don’t think it goes well with CFO of each subsidary. Normally they like to be in FULL control of their accounts set up/make up.
+ No need manual export, format, load data
+ Security access control is much more challenging
+ All must have real time connection to one server

Option 2: Implement into separate Adempiere clients.

Consequences:
– Will be the opposite of above
– Need a consolidation module to produce consolidated Financial Report for holding company.

– If you install in different instances (can be physical or virtual server), you can back up separately. One goes down, the rest is still intact. – But you need to do updates and upgrades to each instances.

Conclusion:

If all of your subsidiaries are the same industry, you can take your bet on first option. Just make sure you have a strong backup and recovery strategy. If not, it is still better to choose second option.

Goodwill Consulting adalah bagian dari komunitas pengembang dan pendukung Adempiere. Jika Anda membutuhkan bantuan profesional untuk implementasi Adempiere, silahkan menghubungi kami.